Marine Navigation: How to Navigate a Boat
Navigating a boat is absolutely, positively nothing like navigating a vehicle on land. There are no roads, few signs other than basic navigational markers outlining major channels, and you may have to contend with fog or an inability to see land or landmarks. In fact, it takes years of accumulated knowledge and advanced learning to become a marine navigational expert. But don’t let that deter you—just as long as you have a firm grip on the basics, learning how to navigate a boat in most inland and nearshore waterways in normal weather conditions is a piece of cake. We can break it down into these simple steps…
How to Navigate a Boat
- Decide on your method: electronic navigation or traditional (analog) navigation.
- If using electronic navigation, start by operating your GPS or chartplotter.
- Make note of your real-time position, speed and direction of travel.
- To get from point “A” to point “B,” create a waypoint.
- String waypoints together to create a route; utilize auto-pilot when applicable.
- For traditional navigation, use: a compass, charters, parallel rulers and dividers.
- Stay within sight of land and use major landmarks as points of reference.
Electronic Marine Navigation
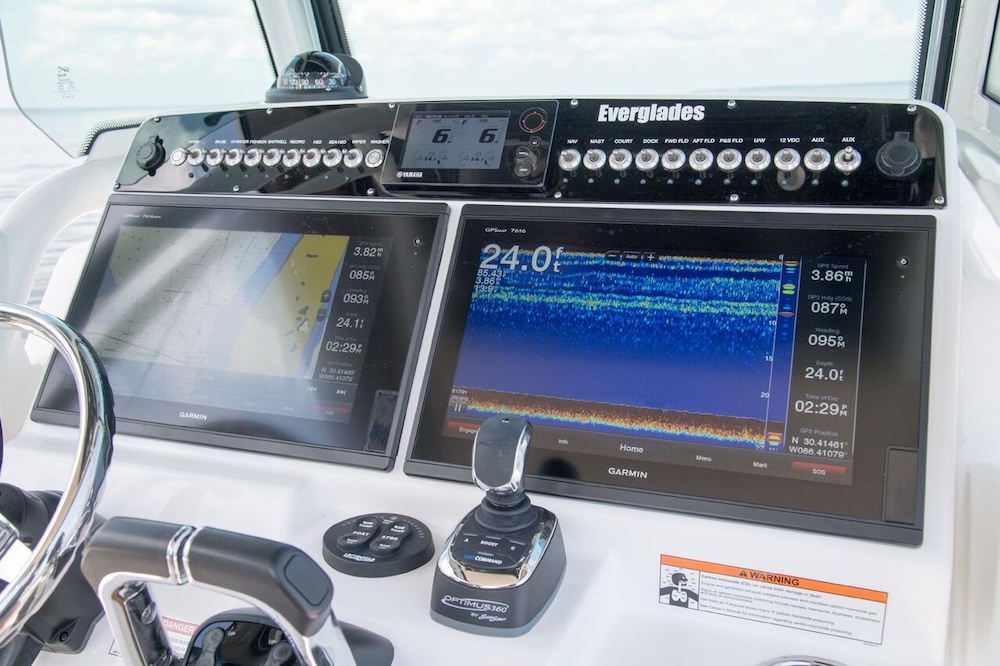
Thanks to modern tech, navigating with a modern GPS/chartplotter is a piece of cake. You can pull up an electronic map (though mariners always refer to their maps as “charts”), which shows your real-time position, speed and direction of travel, and more.
Locating your position is as simple as looking for the boat icon and/or GPS coordinates on-screen. To get from point “A” to point “B,” all you’ll have to do is create a waypoint.
- Depending on how advanced your chartplotter is this might mean scrolling a cursor across the chart, then creating a waypoint by pressing a button.
- In other cases you might have a touch-screen and merely need to tap the position you’d like to create a waypoint at.
- Then, you’ll want to press a “go to” button (or give the screen a swipe, as appropriate for your chartplotter).
- With the navigation from your present position to the waypoint then initiated, the chartplotter will give you a compass course to steer. Most chartplotters also have one or more “steering screens” to choose from, which will display both the desired compass course and the one you’re currently following.
- Use the chartplotter menu to pull this steering screen up, and you’re ready to follow the unit as you steer an accurate course to the waypoint. You can also plot in multiple waypoints and string them together, into a “route.”
The most important thing about creating waypoints and routes and then navigating to them is to look closely at the chart, and make sure you won’t be trying to cross any major obstructions like a finger of land, restricted areas, or waters which may not afford your boat it’s minimum draft (how much water your boat needs to avoid running aground).
Traditional Marine Navigation
Electronics can and do fail, so it’s also important to gain a basic understanding of the tools you need for analog navigation, and keep them aboard your boat at all times. These include:
- A compass
- Charts for the waterways you travel
- Parallel Rulers
- Dividers
With these basics, as long as you’re within sight of land and major landmarks you can figure out where you are and where you’re going.
Compass
A compass tells you which direction your boat is heading in—north, south, east, or west – as measured in degrees relative to magnetic north. There are 360 degrees representing a full circle. Zero degrees on the compass is north, 180 degrees points south, it’s 90 degrees to the east, and 270 degrees leads to the west. So a glance at your compass tells you what direction you’re travelling in, at any given time. When you steer your boat to a specific degree on the compass to maintain a straight course, you call this your “bearing.” So if you’re cruising to a restaurant for lunch and it’s directly to your north, you’ll be steering a zero-degree bearing. If it’s to your south you’ll steer a 180-degree bearing, and so on.
Charts
Charts are simply maps of the water and waterways, with special marking for water depths, channel markers, lighthouses, and restricted areas. NOAA produces charts for US waterways which can be viewed online for free, but to get printed versions you have to purchase charts or books of charts (for larger areas) from a NOAA certified agent. You can also pick up charts and chart books for your local waterway in virtually any marine supply store.
Parallel Rulers
Parallel rulers are two rulers attached by a pair of swiveling arms, so you can swing the rulers close together or far apart but they will always remain perfectly parallel. By doing so repeatedly, you can “walk” the rulers across a chart. Why in the world would you want to? Because it will allow you to determine the exact compass bearing of any course you may want to steer. All charts have a compass rose with all 360-degrees printed on them. Place the ruler on top of the chart, on the course line you’d like to steer. Then walk the rulers to the compass rose, and viola—you know what compass bearing you need to steer your boat on to run the course.
Dividers
Dividers have two arms that are attached at one end, and can be pulled apart to different widths at the other end. These are used to measure distance. All charts have a key which shows scale by miles and nautical miles. Hold the dividers up to the scale and pull them apart until the arms’ width equals the chart scale for a mile or any increment of miles (it’s common to see one, five, 10, or even 20 mile increments depending on the scale of the chart). With the dividers set you can then use them to measure the distance between any two points on the chart.
View the full article here.